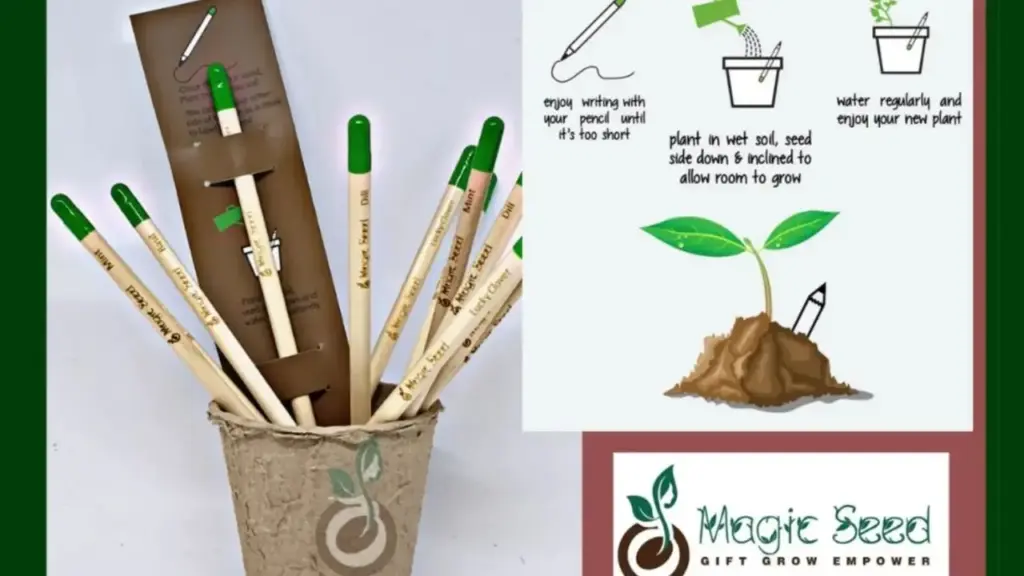
Have you ever thought about what happens to your pencil once it becomes too small to write with? Instead of throwing it away, imagine being able to plant it and watch it grow into a beautiful plant. That’s where the magic of seed pencils comes in. These innovative pencils are designed with embedded seeds that, after use, can be planted in soil and sprout into a variety of plants. From writing to sprouting, planting your seed pencil is an eco-friendly and rewarding experience. In this guide, we’ll walk you through every step of how to plant your seed pencil and help you contribute to the environment, one sprout at a time.

From Writing to Sprouting: A Green Revolution
Seed pencils are an amazing way to bring sustainability into your daily life. With the power of embedded seeds, they not only serve their purpose as a writing tool but also transform into something greater. The process of planting a seed pencil is simple and involves just a few easy steps. Whether you’re interested in growing flowers, herbs, or even vegetables, seed pencils give you the opportunity to turn waste into something useful and beautiful. You’ll find that planting a seed pencil isn’t just about growing a plant – it’s about engaging in a fun, eco-friendly activity that connects you with nature. Let’s dive into the specifics of how to plant your seed pencil and watch it sprout into a vibrant plant.
From Writing to Sprouting
| Step | Description |
|---|---|
| First Step | Find a spot in your garden or a pot for planting your seed pencil. |
| Second Step | Ensure the soil is loose, well-drained, and nutrient-rich. |
| Third Step | Bury the pencil with the seed end facing downward in the soil. |
| Fourth Step | Water the area regularly and keep it in a place with adequate sunlight. |
| Fifth Step | Be patient as the seed begins to sprout and eventually grow into a plant. |
Planting your seed pencil is a simple yet impactful way to help the environment and learn about sustainability. By following these easy steps, you can transform a used pencil into a flourishing plant. From the initial planting to watching it grow, the process is both fun and educational. Whether you choose to grow herbs, flowers, or vegetables, you’re not just reducing waste – you’re contributing to a greener world, one pencil at a time. So next time you’re about to throw away your stubby pencil, think again. Instead, plant it and watch nature take its course.
Step 1: Choose a Suitable Location
When it comes to planting your seed pencil, choosing the right location is the first and most important step. You can plant your seed pencil in your garden or use a pot if you don’t have access to outdoor space. If you’re planting outdoors, pick a spot that receives plenty of sunlight, as most plants require sunlight to thrive. If you’re opting for container gardening, make sure the pot is large enough for the plant to grow and has proper drainage holes to prevent the roots from rotting. By selecting the right spot, you’ll ensure that your seed pencil has the best chance of sprouting successfully.
Step 2: Prepare the Soil
Once you’ve picked a good location for your seed pencil, it’s time to prepare the soil. For outdoor planting, make sure the soil is well-drained and rich in nutrients. Adding compost to the soil can help improve its texture and fertility. If you’re planting in a pot, use high-quality potting soil designed to retain moisture while ensuring good drainage. It’s also important that the soil is loose, as compacted soil can make it difficult for the seed to germinate. After preparing the soil, make sure it’s moist but not overly wet, as excess moisture can cause the seeds to rot.
Step 3: Plant the Seed Pencil
Now comes the exciting part: planting your seed pencil! Gently bury the seed end of the pencil in the soil, making sure it is facing downward. The seed end typically contains a small section of embedded seeds, so it’s important to plant it carefully to give the seeds the best chance of sprouting. Don’t worry about the rest of the pencil – it can remain above the soil surface. By planting it this way, you’ll help the seeds stay protected while giving them the space they need to grow. The type of seeds in your pencil can vary, ranging from flowers to herbs or vegetables, so be sure to check what’s inside your pencil for more specific planting guidelines.
Step 4: Water and Maintain
After planting, you’ll need to care for your seed pencil by keeping the soil moist and ensuring it gets the proper amount of sunlight. Water the soil regularly, but avoid overwatering, as this can drown the seeds and hinder growth. The soil should remain slightly moist at all times, but not soaked. In addition to watering, ensure your seed pencil is in a location that receives the right amount of sunlight based on the type of plant. For example, sunflowers will need more sunlight than herbs like basil or mint. Regular maintenance and observation will help your seed pencil germinate and grow into a healthy plant.
Step 5: Watch It Grow
The last step is to be patient and watch as your plant begins to sprout. Depending on the type of seed in your pencil, germination could take anywhere from a few days to a few weeks. Keep an eye on your plant as it starts to grow, and continue to water and provide sunlight. In a few weeks, you’ll see the first signs of life – tiny shoots emerging from the soil. As the plant continues to grow, you’ll witness the joy of nurturing something from seed to sprout. It’s a rewarding process that not only helps you connect with nature but also contributes to a greener world.
What Can You Plant from a Seed Pencil?
Seed pencils offer a variety of plant options, depending on the seeds they contain. Some of the most common plants you can grow from a seed pencil include:
- Flowers: Daisies, sunflowers, marigolds, and other vibrant flowers.
- Herbs: Basil, mint, parsley, and thyme.
- Vegetables: Lettuce, carrots, and tomatoes.
The seeds embedded in the pencil will determine the care requirements, so be sure to check the packaging or instructions that come with your pencil. This will ensure you’re providing the ideal growing conditions for the seeds inside. Whether you want to grow flowers, herbs, or even a small vegetable garden, a seed pencil can help you make that happen.
Benefits of Using Seed Pencils
Seed pencils aren’t just about planting a pencil and watching it grow; they’re also a great way to contribute to environmental sustainability. Here are some reasons why seed pencils are a fantastic choice:
- Eco-friendly: Made from biodegradable materials, seed pencils help reduce waste.
- Dual-purpose: They serve as both a writing tool and a way to grow plants.
- Educational: Planting seed pencils is an engaging activity that teaches kids and adults about sustainability and gardening.
- Encourages Green Living: By growing plants, you contribute to a healthier environment and reduce your carbon footprint.
Not only do seed pencils allow you to be part of a green revolution, but they also offer a unique, hands-on experience of growing your own plants.
Write, Recycle, Repeat: The Surprising Story of Newspaper Pencils
FAQs
1. Can I plant any type of pencil?
No, only pencils that are specifically designed with embedded seeds can be planted. These are often sold as seed pencils and are made from biodegradable materials.
2. How long does it take for a seed pencil to sprout?
The sprouting time can vary depending on the type of seed. Generally, it takes a few days to a few weeks for the seed to germinate and begin sprouting.
3. Can I plant a seed pencil indoors?
Yes, seed pencils can be planted indoors in a pot or container, as long as they receive enough sunlight and water.
4. How do I care for the plant after it has sprouted?
Once the plant has sprouted, continue to water it regularly and ensure it receives adequate sunlight. You can also transplant it into a larger pot or your garden once it outgrows its initial container.
5. What types of plants can grow from seed pencils?
Seed pencils can grow a variety of plants, including flowers like sunflowers and marigolds, herbs like basil and mint, and vegetables such as carrots and lettuce. The type of plant depends on the seeds embedded in the pencil.


